How to Make Delicious Homemade Bread from Scratch
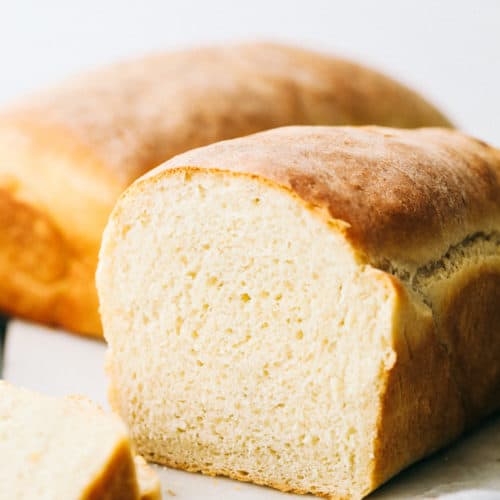
Making homemade bread from scratch is a rewarding and enjoyable process that results in a delicious, fresh loaf with a perfect crust and soft interior. Whether you’re a novice or an experienced baker, following the right steps will help you achieve the best results. This guide will walk you through everything you need to know about making homemade bread, from selecting ingredients to kneading, proofing, and baking.
Choosing the Right Ingredients
The foundation of any great bread is high-quality ingredients. The basic components of bread include flour, water, yeast, salt, and sometimes sugar and fat. The type of flour you choose significantly impacts the texture and flavor of your bread. All-purpose flour works well for many recipes, but bread flour, which has a higher protein content, provides better gluten development, resulting in a chewier texture. Whole wheat flour can be used for a more nutritious and hearty loaf, though it may require additional hydration due to its higher fiber content.
Yeast is another crucial ingredient, as it helps the dough rise by producing carbon dioxide. You can use active dry yeast, instant yeast, or fresh yeast. Instant yeast is often preferred as it does not require proofing in water before mixing with dry ingredients. Salt adds flavor and controls yeast activity, while sugar can enhance browning and provide food for the yeast. Water is essential for gluten formation, and fats such as butter or olive oil can add richness and improve texture.
Mixing and Kneading the Dough
To start, mix your dry ingredients—flour, yeast, salt, and sugar—in a large bowl. If using active dry yeast, dissolve it in warm water (around 110°F or 45°C) with a pinch of sugar and let it sit for about 5-10 minutes until frothy. Once your yeast is activated, gradually add water and any fats you are using. Stir until a rough dough forms.
Kneading is a vital step in developing gluten, which gives bread its structure and elasticity. You can knead the dough by hand or use a stand mixer with a dough hook. If kneading by hand, turn the dough onto a floured surface and push it away with the heel of your hand, fold it back, rotate, and repeat for about 8-10 minutes. The dough should become smooth and elastic. If using a stand mixer, knead for about 5-7 minutes on medium speed.
First Rise (Bulk Fermentation)
After kneading, place the dough in a lightly greased bowl, covering it with a damp towel or plastic wrap. Let it rise at room temperature for about 1-2 hours or until it doubles in size. The rising time depends on room temperature and yeast activity. A warmer environment speeds up the process, while a cooler one slows it down.
During this stage, fermentation develops flavor and structure in the bread. You can test if the dough has risen enough by gently pressing a finger into it; if the indentation remains, it is ready for the next step.
Shaping the Dough
Once the dough has risen, gently punch it down to release excess gas and divide it if making multiple loaves. Shape the dough according to your preference—round boules, rectangular loaves, or even rolls. When shaping, fold the dough’s edges inward to create surface tension, which helps the loaf maintain its structure during baking.
Second Rise (Proofing)
After shaping, place the dough onto a baking sheet or into a greased loaf pan. Cover and let it proof for about 30-45 minutes until it puffs up. This step allows the dough to relax and achieve its final volume before baking.
While proofing, preheat your oven to 375°F-450°F (190°C-230°C), depending on the type of bread. A higher temperature creates a crispier crust, while a moderate one results in a softer loaf.
Baking the Bread
Before placing the bread in the oven, you can score the top with a sharp knife or lame to control expansion. For a crusty loaf, create steam in the oven by placing a pan of hot water on the lower rack or misting the dough with water before baking.
Bake the bread for about 25-40 minutes, depending on size and type. A fully baked loaf should have a golden-brown crust and sound hollow when tapped on the bottom. An instant-read thermometer inserted into the center should read around 190°F-200°F (88°C-93°C) for standard bread and up to 210°F (99°C) for artisan loaves.
Cooling and Storing
Once baked, transfer the bread to a wire rack to cool for at least 30 minutes before slicing. Cutting too soon may result in a gummy texture due to trapped steam. Store bread in an airtight container at room temperature for up to three days or freeze for longer storage.
Conclusion
Making homemade bread from scratch is a fulfilling experience that allows you to control ingredients and customize flavors. By following these steps—choosing quality ingredients, kneading properly, allowing adequate rise times, and baking at the right temperature—you can create delicious, bakery-quality bread in your own kitchen. Enjoy your fresh, homemade loaf with butter, jam, or as part of your favorite meal!


Post Comment